“Create Your Own Modern Tiled Planters”


If you have ever tackled a home project, then you’ll know that there is always a ton of scrap materials at the end. We try to use as much from the “junk pile” as we can, especially the wood (there are so many great scrap wood projects out there!), and we keep a lot for future projects too. Have you ever had spare tile sitting around? If you have five sheets, or four sheets and some scraps, you can make your own simple tiled planters.

Here’s everything you need to make these tiled planters:
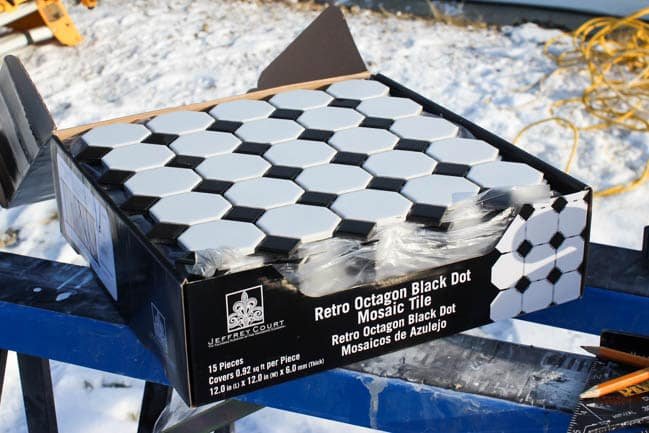
Five sheets of tile – Retro Octagon Black Dot
Cement board
1/2 x 1″ wood (we used scraps)
Moulding (we used scraps again)
Plastic sheet
Thin set
Grout
Nails
Drywall screws
Black paint
Tools:
Tile saw
Saw
Nail gun
Trowel
Drill with mixing paddle
Sponges & buckets (for cleaning)
Steps to Make Tiled Planters:

Start by using your sheet of tile as a reference for how wide your planter will be. The easiest way to make this planter is to make it the same width as a sheet of tile.
Cut your cement board to that width. Cut two pieces so that they are the same height as well, then cut two more pieces subtracting the width of the cement board twice (e.g. if you have 1/2″ cement board, subtract 1″).
Build a frame from 1/2″ by 1″ wood as pictured above. Remember to take into account the thickness of your cement board (two sides will be 1″ longer again). Use glue and a nail gun to build the frame. Then use drywall screws to attach the cement board to the frame.
Note: We used cement board instead of wood because tile sticks better to it, and it eliminates rot issues when you are watering your plants.
 Next, use your tile saw to cut the edge of your tile sheet flat – in our case, we had to cut off half of the black triangles on two sides. Then, to complete the other two sides, take some tiles out of your spare sheet, and cut those (we cut the small black triangles to fit perfectly into the gaps on the edges).
Use thin set and a trowel to set tiles onto planter.
 Finally, when your tiles are set, you need to grout the tile and the edges of the planter.
If you want, you can line the planter with plastic (we used leftover vapour barrier). This will allow you to water the plants indoors without any leaking. Use a staple gun to attach the plastic.
Finally, you can make a top for your planter. We used scrap pieces of MDF moulding, but you could use wood or tile if you wanted too. We cut the pieces with a 1/2″ overhang, and at 45 degree angles in the corners. Finally we painted them black to match.

When it was done, I filled it with my snake plant that desperately needed to be re-homed. It now sits proudly in my entryway!


Would you make one of these planters? What would you do with leftover tile?


